How to Use Krushna's Ashtakavarga Wheel
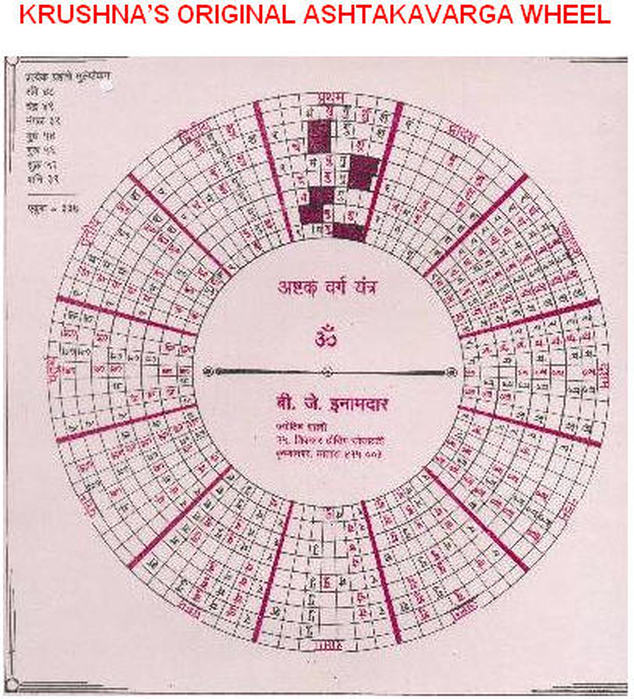
From his very early days, Krushna designed his own version of using the Ashtakavarga distribution pattern and set it into a circular wheel fashion rather than the usual linear method as we see today. He also used the actual abbreviated names of the planets to represent the dots instead. Originally, his manual wheel consisted of different sized layers of circular paper overlapping themselves in order to make up each concentric layer of the 7 planets so that he could “spin” each layer and line it up according to the natal pattern of the person’s chart. He would attach all the layers with a pin in the middle to rotate the layers together and in this way he would be able to use his original wheel. It was also written in the Marathi language.
A while back, I thought it would be a novel idea to update his wheel and redesign it so that it could actually “spin” on the computer instead. He also asked me to add in the Multiplication Factor row, so I did that as well. His original wheel looked like this:
Click the blue link below see the fully functional version of the wheel as it looks today. Move your mouse over the wheel while holding down the left mouse button, to see how the inner concentric circles turn.
Asktakavarga Wheel
UPON OPENING THE WINDOW
When first opening up the Ashtakavarga Wheel, you will notice a large circle with a series of concentric rings. The outer two rings are stationary and do not move. (They represent the HOUSE names and the ASCENDANT ring.) Neither does the innermost green centered area of the wheel. As you run your mouse over the circle, notice that it changes from a regular arrow symbol into a pointed index finger over certain parts of the wheel. Once you see this, you will be able to spin that part of the circle by dragging your mouse over any one of the inner concentric rings. After you get the hang of it, you can “spin” the inner circles all at the same time if you prefer, somewhat like a roulette wheel, in either direction you choose, to get the feel of the rotation of the wheel.
THE BASICS OF THE WHEEL
The wheel is equally divided into the 12 houses of the zodiac with the first house at the top. The houses are indicated on the outer ring of the circle in yellow and the ring itself is stationary. The next inner white colored ring represents the ASCENDANT row and also does not move. Each smaller concentric circle from that point on will rotate around the wheel freely as you drag your mouse over it, while holding down the left mouse button and each layer is represented by a particular planet, indicated by the blue rectangular box that is located in the first house upon opening the program.
Every house is also divided into 7 sector columns, each column representing a particular planet. They are listed from the 1st to the 7th columns as follows and are in the same order for every house:
SUN, MOON, MARS, MERCURY, JUPITER, VENUS and SATURN
As an example, if we look at the SUN’S distribution pattern on a linear chart for all 12 houses, it would look like this chart below: (fig.1) The SUN distributes 48 benefic points to each of the following houses from its natal position in the chart. Every other planet helps to distribute the Sun’s overall points to their own assigned houses below as it relates to their own natal positions
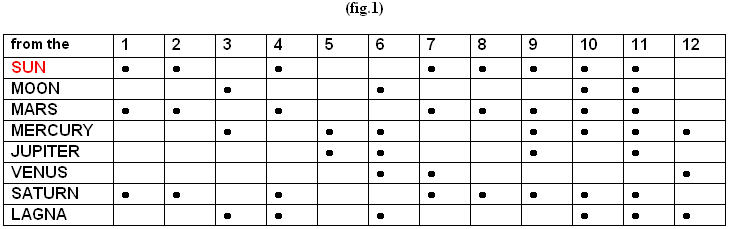
Now let’s look at the Ashtakarvarga Wheel to see how the SUN’S distribution patterns fit into the circle. When we look at the 1st house of the linear chart, we can see that the dot symbol occupies the SUN, MARS and SATURN spaces in the first column.
Similarly, on a slice of the wheel below (fig.2), if we look to the first house in the SUN’S Column, (which is the first column for every corresponding house), we will see that the “Su” symbol intersects on the Sun row, the MARS row and on the SATURN row. So for the 1st house, the SUN gives 3 points or bindus.
Now look at the 12th house from the linear chart (fig.1) and correspond it to the wheel below (fig.2). You will see the first column for the Sun in the 12th house and how it distributes its points to the Mercury row, the Venus row and the Lagna or Ascendant row (in white). For the 12th house, the Sun gives 3 points or bindus.
If you look at the SUN’S distribution points for the 11th house on the linear chart above, (fig.1), you can see how every single row, except VENUS, is taken up with a dot, totaling 7 dots ( or points) for the 11th house. On the wheel below (fig.2), you can see part of the 11th house on the right hand side. If you count all the “Su” points in the Sun column, you will see that there are also 7 points for the 11th house.
There are 8 bindus maximum allowed for each house, which is represented by the 8 different rotating layers or rows going around the wheel. The total points of all the planets in each house as a whole, represents the total SAV points. The use of the wheel comes in especially handy when you want to see the cluster of the SAV points from every house all at a glance. For example, look at the 11thhouse and you will see how busy this house is compared to the other houses. All the spaces, with the exception of two, are occupied. There are 56 spots available for every house and the 11th house has 54 bindus occupied. Compare it to the 12th house, which only has 16 of its 56 available spots occupied and is fairly empty compared to the almost fully occupied 11th house.
Similarly, you can do this for every house around the wheel and see how the SUN’S bindus are distributed and how strong it is, by looking at its MULTIPLICATION FACTOR or MF. This is located at the very center part of the wheel, where you see the planetary glyphs at the base of each planetary column and a number such as 1.2, 1.0, 0.8, and so forth, above each one. These numbers indicate the MF strength of the planet representing that column. Therefore the Sun in the 1st house would have a Multiplication Factor strength of 1.4, while the SUN’S strength for the 12th house would only be 1.2 and for the 11th house, it would come in at only 0.5 strength. The higher the number, the stronger the planetary effect. For more information on the Multiplication Factor, please refer to LESSON 26 in the LESSONS section.
(fig 2)
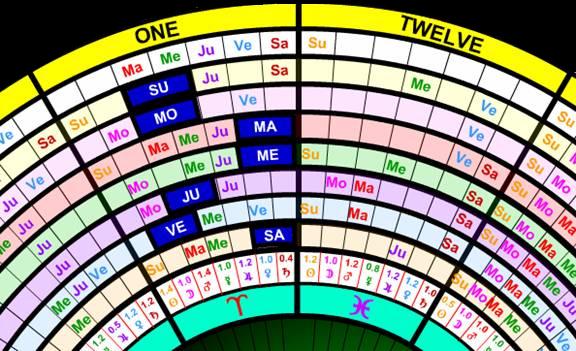
On the same layer as the Multiplication factor line, are the individual signs that need to be rotated accordingly so that the proper ascendant sign matches up to the 1st house. Therefore, if a person was a PISCES ascendant for instance, you would rotate the inner layer at the center of the wheel so that the planetary glyph of PISCES is right under the 1st house. As you can see in the above illustration, the ascendant is ARIES as it sits right under the 1st house of the wheel. In this manner you can judge the proper Multiplication Factor strengths for each column according to its proper sign.
HOW TO ENTER A NATAL CHART INTO THE WHEEL
In order to use this wheel you will need the house locations of all the 7 natal planets from whatever natal chart you select as well as the natal ascendant.
For this example, the ascendant is AQUARIUS.
SUN is in the 1st house.
MOON is in the 6th house.
MARS is in the 2nd house.
MERCURY is in the 1st house.
JUPITER is in the 12th house.
VENUS is in the 1st house.
SATURN is in the 7th house.
1. First, rotate the inner ascendant wheel so that the glyph sign of AQUARIUS is now lined up directly underneath the first house.
2. Since the SUN is already placed in the first house, there is no need to rotate that ring. Do note though that the blue rectangle acts as the indicator for the “Su” symbol 2 spaces to the left of it as you can see in the first house.
3. Next, rotate the MOON layer so that the blue rectangle goes to the 6th house on the wheel. Take note that it isn’t important to line up the blue rectangle itself, but rather the pink “Mo” one space to the left of it, so that it lines up correctly in the MOON column of the 6th house. This also syncs up all the other “Mo” bindus to their proper columns from all the other houses in that layer when done correctly.
4. For the planet MARS, rotate the MARS layer so that the blue rectangle goes to the 2nd house and the “Ma” symbol 3 spaces to the left of it is properly lined up in the MARS column of that house.
5. For MERCURY in the 1st house, no change will be necessary since it is already in its proper location. Note however that the “Me” position is 2 spaces to the left of the blue rectangle.
6. Next, rotate the JUPITER layer so that the blue rectangle goes to the 12th house and the JU symbol one space to the right of it lines up correctly in the JUPITER column. Note that if you chose to line up the JU symbol to the LEFT of the blue rectangle, it will push the blue rectangle to the 11th house, not the 12th.
7. For the planet VENUS, we do not have to change anything as it is already in the 1st house and is properly lined up. Do note however that the blue rectangle is the marker for the “Ve” symbol 3 spaces to the right of it.
8. Last but not least, the planet SATURN goes to the 7th house. In this case, there IS no SA symbol close to the blue rectangle, so we line up the rectangle to the very edge of the line (as you can see in its 1st house placement). You can also just line up the “Su” position from this layer to its proper column for that house and everything else will automatically sync itself up properly.
Now that all the planets are in their places, every column on the wheel should have it own planet in its own proper column. In other words as you look around the wheel, all the MOONS should line up in their columns, all the SUNS should line up in their columns, etc.. You should never see a “Ma” symbol in a “Su”, or “Ve” or “Ju” column for example. If you do, then you’ve made a mistake somewhere.
Do not get confused by thinking that you have to line up the blue rectangle to the proper column. They simply act as markers for the proper symbols to the left or right of it as explained previously. In this way, you use it as a focal point in order to locate the correct house position at a glance and also rotate the proper planetary symbol to its correct place on the wheel.
After a few attempts at spinning the layers of the wheel, you will soon grasp the idea and it will become a simple procedure to line up the proper planets to the proper houses using the blue rectangles as the markers.
Have fun with this wheel. It is a different and unique way of viewing how the ashtakavarga points are distributed in each of the houses and much can be learned from it with a little practice.